Blog Archives

Aside

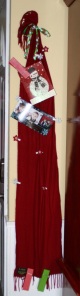
I’ve been wanting to make a card holder for the Holidays for a few years now. I’ve found so many great and easy ways to display them.

I was going to cut some wood, paint it, let it dry, paint some clothes pins, let those dry, nail it all together and embellish it. But for whatever reason, the thought was just too overwhelming. So I went for the EASIEST.

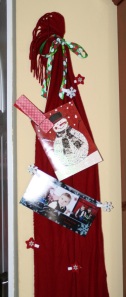
All I did was grab an inexpensive red scarf, you know the cheap ones you get or give as stocking stuffers, and some cute clip pins I found already decorated at Micheal’s Craft Store. Best part was that they were in their dollar bins.

cardHolder scarf

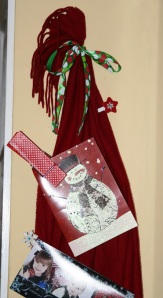
I tied a bow at the top so it would hang on the wall and then added the clips. That was IT. And thank goodness because it’s been quite a week with the kids.

cardHolder

This can be temporary. So if you want to wear that red scarf on New Years, just remove the cards and it’s ready. Or you can roll it up and add it to your Holiday box of decorations and store it for next year.

Now I’ll just wait for more Holiday cards to display. Happy Holidays!

card holder scarf

Holiday Card Display

Aside

I’m so happy it’s soup making season. I love the cooler weather and delicious home made soup. One easy way to be ready to make almost any soup is to have a vegetable broth on hand. It is so easy to make your own, especially if  you’ve been saving up all your vegetable skins and scraps in the freezer.

I’ve been saving all those throw away onion peels, carrot and celery tops, zucchini and potato skins and keeping them in a plastic bag in the freezer. You save so much money making your own broth and you save the best flavors as well.

I grabbed my bag from the freezer and some veggies I had lying around and threw them in some boiling water. I added herbs from the garden and salt and pepper. Then brought the water up to a boil and let it boil for an hour.

Last just strain your broth, throw out the veggies this time and use your broth right away or refrigerate it. Can’t wait to make some soup in a few days in this chilly weather.

Enjoy

So Happy it’s Soup Making Season!

Aside

Father’s Day is this weekend so I wanted to find a good Dad’s craft. So whats more typical for Father’s Day then a tie? Not all Dad’s wear ties but I found this re-purposing to be super fun and really useful.

We will be putting hidden pockets in Dad’s tie! Did you also know its bad for your back to sit on a wallet gentlemen?

All you’ll need is an inexpensive tie (in case you ruin the tie on your first attempt), needle and thread, scissors, pen, credit card or business card.

First you want to snip the thread that holds the back and bottom of the tie together. Next sew a straight line on the bottom of the tie making the bottom of the pocket. There is a thick material in between the silk and front of the tie so make sure you sew the silk to the thick material and not through to the front. You don’t want to see the pockets from the front of the tie.

Next you’ll want to use the credit card to measure the size of the pocket. You want it the same size as the card. Next cut the sides of the tie using your measurements. Then fold the tops of both sides down and sew the folds in place. This makes the pocket visible from the back and a bit smaller then the card so you can get to the item easier.

Now fold the top of the silk pocket down and sew this fold in place. Again sew the top of the pocket cut tie to the stiff material carefully not sewing all the way through to the front. Now the seems of the pockets look nice and clean. Lastly sew the two sides of the tie back together.

One final touch, if you want, is to put a small slice in the tie further up for a pen to fit.

Now your tie is done and can hold a pen and cards for those impromptu meetings!

Repurposed Tie for Dad

Aside

There are only a few weeks left of Spring and I had a few more Spring cleaning and organizing I really needed to get done.  I found some great ideas online and made them my reality. And I’m so happy I did!

First I had to tackle my tiny 1949  home’s even tinier linen closet. I folded up my sheets and tucked them inside the matching pillow case. Are you kidding me? It’s that easy? Why have I not heard of this before? There is sooooo much more space now! Ok so I really folded them as perfect as possible and no Martha Stewart, I don’t iron my sheets, so I’m sure there will be folded marks. But as usual, when I get those sheets on nice and tight and after one night of sleep on them, there are no more wrinkles left. haha I’m just happy the linen closet is finally organized!

I had my husband buy me a small cheap shower curtain rod for my next organizing project. I hung it under my kitchen sink where all my cleaners are. I hung up each spray cleaner on the rod and now I can see and find everything I need so much easier. This was super crowded since ALL my cleaners are in one  child proofed spot, So happy that the sink is also organized now!


Lastly I wanted to repurpose a tall glass vase I have to organize my hair scarves. Sadly I cannot find this vase. I think I may have let someone borrow it, but I found my cute short one, and well you get the idea. This looks so pretty to use as a decoration and for storage. Now my scarves aren’t out of sight out of mind. I can see them and now make more use of them.

Thank you Spring for making me clean and organize. Now I’m ready for Summer!

Repurposing and Organizing

Aside

This week’s blog should be called RepurposingDad. My husband actually put this robot together. But I did save, and I cleaned all the canisters to reuse. So it was a joint effort after all.

My son is having his 1st birthday party in a week and we are doing a robot theme. I thought it would be fun to make our own mascot out of reused pieces. I got this idea from my nephew. He made his own robot similar to what we made. I wish we had a picture of his to share.

Obviously this would be a fun project for an older boy.

What we used: soup cans, baby formula canister, tin cookie square box, silver paint, screws and a drill and a pop rivet gun. I have never heard of this rivet gun tool until my husband used it. You know, it’s a super handy craft tool to have that costs about$20.

Here’s our robot. Next we need a face, maybe I’ll grab my extra buttons for eyes. Then we need to name him, or her!

Thank you Hubby!

DIY Robot – Reusing Cans and Tins

Aside

I wish I had a walk in closet, not for my clothes, but for all my jewelry. I LOVE jewelry and wish I could showcase it all. I have a great jewelry curio but I still can’t see all my jewelry to remember what I have.

So this is a fun way to showcase some dangling earrings. I have a really cute frame that the glass cover broke out of, so it’s perfect to use. I got out my scrap material, ribbons, scissors, glue gun and picture frame. That’s all you need.

The material I picked has a  landscape print. So I picked the picture I wanted to frame. I measured with the backing of the frame and added 1/4 inch more around each side. Then I added hot glue to all the edges and folded it over the back of the frame. Next I grabbed the ribbon and cut 3 of the same pieces since that’s all my small frame would fit.  Again I glued these each around the back of the frame. I added hot glue to the center of each ribbon strip to secure it from the weight of earrings.

Can you imagine how cute this would look with a large vintage frame you can find at a thrift store? Spray paint it and pick out some fancy fabric to cover half your wall with. Then you could fit all your large dangles. I think I may need to do that with my daughter’s room when we pierce her ears.

How shabby chic! Can’t wait!

Showcasing Jewelry by Repurposing a Frame

Aside

This was a fun project with my daughter this week. She loves her scrambled egg in the morning so we go through quite a bit of egg cartons. I usually just recycle these but found a fun way to reuse them. We decided to make another bird feeder for the garden. My kids and I love to watch the birds eat while we play outside.

So I cut the top/lid of the carton off and had my daughter decorate it with stickers. I think maybe coloring it might work better since the stickers were having a hard time sticking. But she had fun none the less. Next we cut 2 pieces of twine to wrap around both sides to hold it up steady. We then filled it up with bird seed and my husband hung it up outside for us.

Every time my 2.5 -year-old daughter saw birds, while we were out doing errands the next day, she told them to “Come to my house to eat bird food.” It was the cutest. When we got home we played outside and took pictures of a visitor. Looks like squirrels haven’t found it yet, since it isn’t on the ground yet.

A girl friend of mine also sent me a picture of how she recently used an egg carton to organize her jewelry. This is a great way to actually see the jewelry we forget we have! She cut the carton to fit her jewelry drawer. Great organization idea!

Fun re-uses with egg cartons

Aside

I love everything about wine. I love wine tasting, the smell, the vineyards and even the empty bottles.  There are so many fun things to do with recycled wine bottles.

One thing we do is the easiest, we recycle.  Grandpa actually takes them to a recycling center and gets cash for them along with other glass and plastic bottles and we add every cent to the kid’s savings acct. We have been doing this since my daughter was born in 2009 and she actually has more money in her savings then we have in ours. Not that that’s hard.  Two kids are expensive!

My second favorite thing to do with empty wine glasses is to make lights out of them. My close friend Gina (SassyCrafts on facebook) does this and gave me one a while back as a gift. It made the best night light in the kitchen for making my daughter’s bottles in the middle of the night. I don’t like to turn on the bright kitchen light and wake anyone up if I don’t have to.  These can also be such great hostess gifts. Lots of us will be heading to someone’s house this season for a beautiful dinner, why not bring a wine light as a gift and or center piece?  There are so many variations of lights you can make. I recommend getting the shortest smallest lights, not over 30, since the bottles can get hot to the touch.  Also buy extra small strands right after Christmas when everything is on clearance. You can make these wine lights all year round.


Just recently I found my third favorite use for them. A friend of ours is getting married and they are using empty wine bottles as all the flower center pieces for their wedding.  Or you can use them for your holiday dinner coming up! Throw in some shorter beer bottles to mix it up as well. The pictures show how colorful, beautiful and eclectic it can be. I even got to use the last of my wild flowers of the season from our back yard. I love this look!  I wish I had done this at my wedding 5 years ago.  What a great way to reuse! I think it’s good luck for the couple to reuse at a wedding, right!?

I LOVE Wine

Aside

You know that t shirt you just can’t throw away?

That t shirt that just doesn’t fit right or the shirt that’s in your to donate bag. Well I found 2 fun ways to turn it into a scarf without sewing. It’s the perfect season to get those scarves out, so why not make some?

This super cute fringe scarf is so simple. get your t shirt and cut the top off right under the arms. from the hem line cut up 1/3 of the way into strips. When done cutting pull each strip pretty hard until they curl up. Pull it around your neck and now you have a perfect fringe scarf.

Second simple t shirt scarf is made with just 2 cuts. first cut the hem off the bottom and second cut the top off under the arms. Then pull and pull as hard and much as possible. Stretch the material until it wont stretch anymore. I even put it under my foot and pulled up. Put the shirt around your neck, loop it and pin it with your favorite broach.


I love how easy these scarves are. If you have a lot of shirts you’re just not wearing why not make some scarves as home made stocking stuffers.  Try grabbing one of your husband’s larger shirts. Large ones are even better! Soon we’ll play with making broaches with fun things at home.

You know that t shirt you just can’t throw away?